- in Book Excerpt , Microphones , Recording by Bobby Owsinski
Don’t Let Phase Cancellation Destroy Your Drum Sound
 One of the most important and overlooked aspects of drum miking is making sure that the mics are all in-phase. This is really important because with only one out-of-phase mic, the whole kit will never sound as big as it should, and if not corrected before all the drums are mixed together, might not be able to be fixed later. Here’s an excerpt from The Drum Recording Handbook 2nd edition (written with Dennis Moody) that looks at an important part of this issue.
“So just what is phase anyway? Without getting into a heavy explanation, it just means that all the microphones are pushing and pulling together. If one mic is pushing while another is pulling, they cancel each other out at certain frequencies.
There are two types of phasing problems that can happen – electronic and acoustic. An acoustic phasing problem occurs when two mics are close together and pick up the same signal at the same time, only one is picking it up a little later than the first because it’s a little farther away. That said, electronic phasing of the mics is just as important.
Why would there be an electronic phase problem? Most of the time it’s because a mic cable was mis-wired (either repaired incorrectly or originally wired incorrectly from the factory), or the microphone itself is sending a signal that’s out-of-phase from the other mics that your using. In other words, one mic is outputting a positive voltage on pin 2 of the XLR connector when the other mics are outputing negative on pin 2. This is something that was more prevalent in the days before XLR connections were standardized, so it’s not much of a problem now unless you’re using an old vintage mic.
Regardless of how it happens, there are two ways to check the electronic phase.
Checking Phase The Easy Way
There’s a very easy way to check mic phase. After you get a mix balance of the kit together, flip the phase selector (this is more accurately a “polarity” switch) on each mic channel one at a time either on your console or in the DAW. Leave it on the position that delivers the most low end. Do this on every mic in the kit (select the overhead and room mics in a pair, but check the left mic against the right as well).
Checking Phase The Slightly More Difficult Way
This method takes a bit more work, but you’ll know for sure if you have a mic cable that’s wired backwards. Also, you really have to have another person with you to make this work. It’s a two-man operation.
First you have to pick a mic and make it your “reference.” Any mic on the kit will do, but it’s easier to pick a mic that can easily come off the stand.
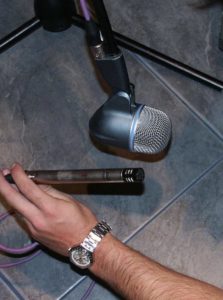
Now take your reference mic and put it next to another mic on the kit, say the kick drum mic, as in the graphic on the left. Make sure that each mic is at the exact same volume level (this is important!). Now have someone talk into the mic while you switch the phase selector on either the console or DAW. Again, choose the selection that sounds the fullest.
Do this to each microphone. Any channel that has it’s phase selector different from all the others has a mis-wired cable. Make sure you mark it so you don’t have the same problem again!”
You can read more from The Mixing Engineer’s Handbook and my other books on the excerpt section of bobbyowsinski.com.
