
- in Production by Bobby Owsinski
A Guide To Miking Brass Instruments
If you’ve not had much experience miking brass instruments then your first inclination might be to put a mic right on the bell of the instrument and call it a day. That probably won’t get you the result that you want though, but these tips culled from the 4th edition of my Recording Engineer’s Handbook will get you a lost closer to what you’re hearing out in the studio.
Since many of the miking techniques are somewhat the same for different brass instruments, we’ll consider them as a family, and I’ll point out any specific differences during placement.
Things To Be Aware Of
- With the mic aimed directly at the bell from a close distance, every bit of spit, excess tongue noise, air leak, and all the other nasties that every brass player occasionally produces is much more apparent. Either moving the mic back a little or pointing it a little off axis of the bell can hide the majority of these unwanted extraneous noises without compromising the natural tonal color of the instrument too much.
- What are the differences between a trumpet, cornet, and flugelhorn? Trumpet is one-third flared tubing and two-thirds straight. Cornet is half and half. Flugelhorn is two-thirds flared tubing and one-third straight. A flugelhorn is really a soprano tuba.
- If the brass instrument itself is shrill, try placing a sock loosely in the bell (which the player probably won’t like), lowering the mics, or pointing them slightly off-axis.
- The recording environment plays a big role in the sound as well. Warm sound rooms with lots of porous wood tend to help the sound, and for the players hear themselves as well.
Placement
Brass instruments require some distance from the mic in order to sound natural, as the sound needs some space to develop. Most of the following placement revolves around different ways of obtaining that distance.
Trumpet
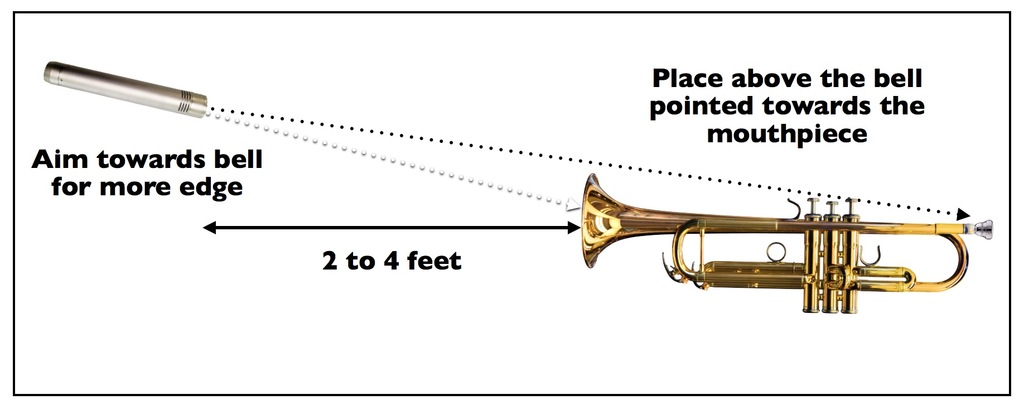
Technique #1: Place the mic about 4 feet away but directly in front of the instrument.
- Variation: Place the mic 3 to 4 feet away, but above the bell and aimed toward the mouthpiece (see the figure below).
Technique #2: For a brass section, place the players in a circle around a Blumlein pair (crossed figure 8’s). Be sure that each player is on the lobe of the pattern and not in the null point. Balance the section by moving the softer horns closer to the mic and the louder ones farther away.
- Variation 1: If a stereo spread is not needed, try something as simple as an omni condenser in the middle of a circle of players.
- Variation 2: Try hanging an omni condenser about 4 feet directly over the horn group as an additional mic.
Trombone
Technique #1: If you are going for a more mellow jazz type of sound, place the mic about 20 to 30 degrees off axis of the bell at a distance of about 2 feet. If you want a more aggressive sound that will cut through a dense mix, mike the horn directly in front of the bell and move the mic in to about 18 to 24 inches.
Technique #2: Ribbon mics are great for trombones at a distance of about 6 to 12 inches from the bell.
Tuba
Technique #1: Position the mic about 2 feet over the top of the bell at about 15 degrees off axis of center. If it sounds too “blatty,” aim the mic more off axis.
French Horn
Technique #1: Place a mic from 2 to 4 feet from the bell at a height that matches the top edge of the bell but aimed toward the center.
- Variation: Add a microphone 2 to 4 feet in front of the player to fill out the sound.
Technique #2: Place a mic about 1 to 2 feet over the player’s head and pointed straight down.
Of course these tips are not the only ways to record brass instruments, but they’ll get you in the ballpark fast, which can be important in a session with a large ensemble.
You can read more from The Recording Engineer’s Handbook and my other books on the excerpt section of bobbyowsinski.com.
