
- in Production by Bobby Owsinski
3 Techniques For Miking Hand Claps
It seems like it’s difficult to do a project without using hand claps on at least one song. Sometimes they’re heard as very distinct claps, while sometimes they’re used to fatten up another element like the snare or percussion. Here’s an excerpt from the 4th edition of my Recording Engineer’s Handbook that takes a look at 3 different techniques for recording hand claps.
Claps are best done in a group, and the more clappers the better. They’re often augmented with foot stomps, boards, or electronic claps to achieve the proper effect, since sometimes claps by themselves just don’t sound big enough.
First of all, here are a number of things to consider before recording:
- Use a fairly live room, back the mike away from the clappers, and use a compressor that has variable attack and release times. Compress heavily (10 to 20dB of gain reduction) a fast to medium attack time so that there’s not too much attack. Set the release time fairly fast.
- Gating (but not too tightly) will help keep the track clean. If you need an “ultra-tight to the snare” sound, key the gate from the snare drum.
- Double-tracking the claps makes them sound far bigger.
- As with other percussion instruments, the peaks are always 10 to 15dB greater than what a typical VU meter is reading (if you happen to be using one). Therefore, it’s best to record the signal at about -20 VU or so, and -10 on a peak meter.
- Try having the clappers sit and slap their thighs. You get twice as many claps and a somewhat darker, more full-bodied timbre, but not as much edge or definition.
- Space the clappers a couple of feet apart distance-wise from the mic. Five people works well. Have the folks nearest the mic clap more on top of the beat and the folks farther away clap more laid back. Split the claps between two styles: sharp slap-clap done by slapping the fingers of one hand into the palm, and a deeper, more standard palm clap done by clapping both palms together. The distance and timing variation gives a nice thick, cascading effect.
3 Mic Placement Techniques
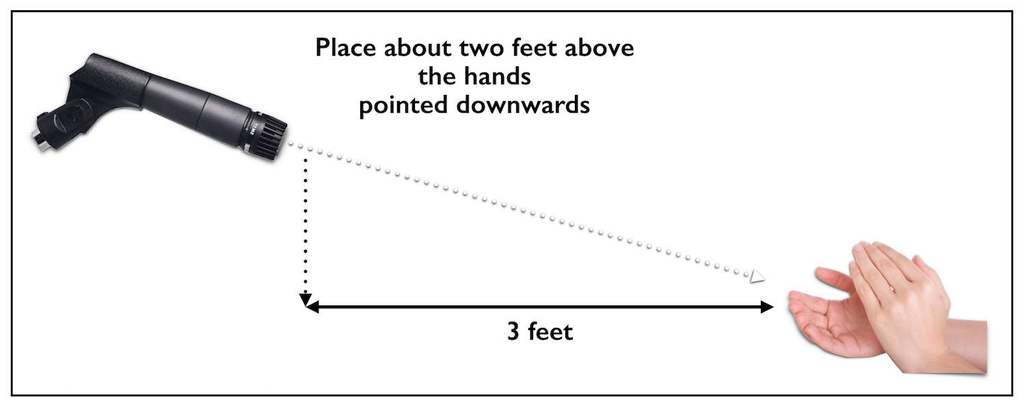
Technique #1: Claps need distance to develop, so start with a dynamic mic (to smooth out the transients) at least 3 feet away (see graphic below).
Technique #2: Use a mic with a figure-8 pattern to avoid any slap echo from the floor or ceiling.
Technique #3: Mix in someone clapping two pieces of wood together (instead of their hands) with the real handclaps (a classic old-school trick).
These aren’t the only techniques for recording hand claps, but they’re a good place to start for some very usable results.
You can read more from The Recording Engineer’s Handbook and my other books on the excerpt section of bobbyowsinski.com.
