
- in Book Excerpt , Production by Bobby Owsinski
A Guide To Saxophone Miking
The saxophone is a relatively new instrument, invented in the 1840s as a means for woodwinds to keep up with the brass instruments in volume and projection. Although most saxes are made of brass they’re still classified as woodwind instruments because sound is produced by an oscillating reed in the mouthpiece of the instrument.
Saxes can be tricky when it comes to capturing their sound, so there are many approaches you can take when recording. Here are a few taken from the latest edition of my Recording Engineer’s Handbook.
Considerations
- The sound of a saxophone comes from every hole and the body of the instrument at the same time, but in totally different proportions for every note. The bell gives you the honk on the highs and some of the low-frequency components, with only the lowest note coming exclusively out of the bell.
- The notes at the top of the instrument range come out of the upper body, left-hand side. Altissimo notes (higher again), typically high-pitched screams, come out the front upper and middle tone holes but are usually much louder than most other notes.
- The bell sound is generally quite focused but disproportionately edgy and harsh. The side pads of the saxes generally radiate a “woody” sort of tone, which by itself can sound like the reed is soggy.
- When they’re warming up, sax players will inevitably find the spot in the room (usually a couple of feet from a wall) where the horn sounds best to them. This may be the best place to put the player or the mic.
Microphone Placement
Technique #1: Place a mic directly in front of the sax at a distance of 12 to 16 inches to capture a sound that’s very authentic.
- Variation 1: Place a second mic at the top of the sax, up on the left of the instrument, near the reed. Since the sound coming from this placement might be a bit harsh, try using a mellower-sounding mic, such as a ribbon. Balance the sound between both mics to get the ideal blend. Move the mics back slightly for more room ambiance and to decrease the valve clicks.
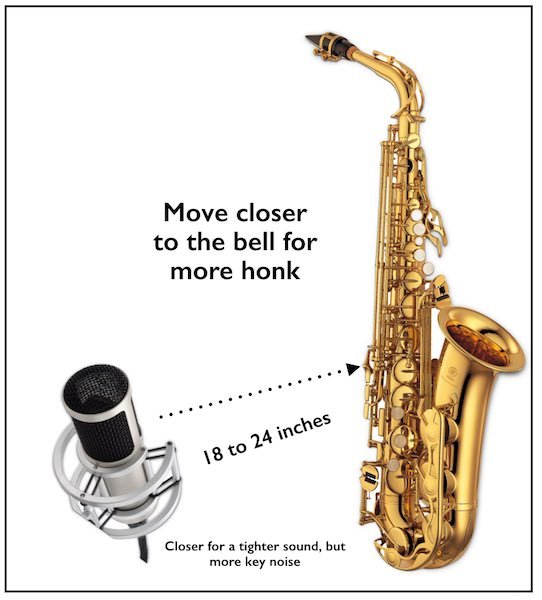
Technique #2: Place a mic about 18 to 24 inches away from the player’s left side of the instrument, about halfway up the keys, and aimed slightly down at the bell (see Figure 9.39). Have the sax player play the song that you’ll be recording. Try moving the mic 6 inches closer to the sax for a tighter sound, but be careful not to pick up the valve clicking as well. If you move the mic away from the sax, you’ll pick up more of the room ambiance.
Technique #3: Place a mic at about neck or face high of the player, aiming down at the horn.
Technique #4: Position the mic about 3 feet away, slightly above head height and about 30 degrees to left of the player, aimed toward the middle of the horn.
Technique #5: For soprano sax, place the mic above the sax at about the midpoint, aimed straight down.
As you can see, there are many approaches to saxophone miking. Some will only work in an overdub situation, but there will be plenty of tone to choose from.
You can read more from The Recording Engineer’s Handbook and my other books on the excerpt section of bobbyowsinski.com.
